Display Images From a SQL Server and MySQL Database Using PHP and PDO

I’ll show here how I displayed images stored in a database, in a blob column. There are a few variation between the code of each database. I divided the article in three steps. We’ll use PDO with PHP 5.3 and later. It can work with prior versions but I did not try. I describe a method to show images and play sounds. Most of the time, you will want to make a page showImage.php?id=25 or a playSound.php?id=414 and call those pages in HTML tag img and audio.

Step 1 : Connection

The options I use:

1
2
3
$options = array(PDO::ATTR_ERRMODE => PDO::ERRMODE_EXCEPTION,
          PDO::MYSQL_ATTR_INIT_COMMAND => 'SET NAMES utf8',
          PDO::ATTR_DEFAULT_FETCH_MODE => PDO::FETCH_ASSOC);

Let’s describe those:

  • Setting ATTR_MODE to Exception allows you to handle errors easily. When I write a new request, I use setAttribute to set the error mode to warning.
  • The FETCH_ASSOC is explained in the documentation: it returns an array indexed by column name as returned in your result set. With SQL Server, I can’t get back columns with accents in the name: I have to use aliases ortherwise the array returned by PDO will have some strange named columns, with black question marks.
  • Set Names UTF-8: SET NAMES indicates what character set the client will use to send SQL statements to the server (source). Of course, it only works with MySQL.

Mysql:

1
$pdo = new \PDO("mysql:host=" . BDD_DSN . ";dbname=" . BDD_NAME, BDD_USER, BDD_PASS, $options);

SQL Server:

This might not work, because you need a specific driver to apply the solution I’m using. You have several ways to know if you are eligible. The driver is not enabled in WAMP but it looks like it is included, you should only have to enable it and restart your server.

  • create a file that contains <?php phpinfo(); and search for one of these lines. phpinfo SQLSRV configuration

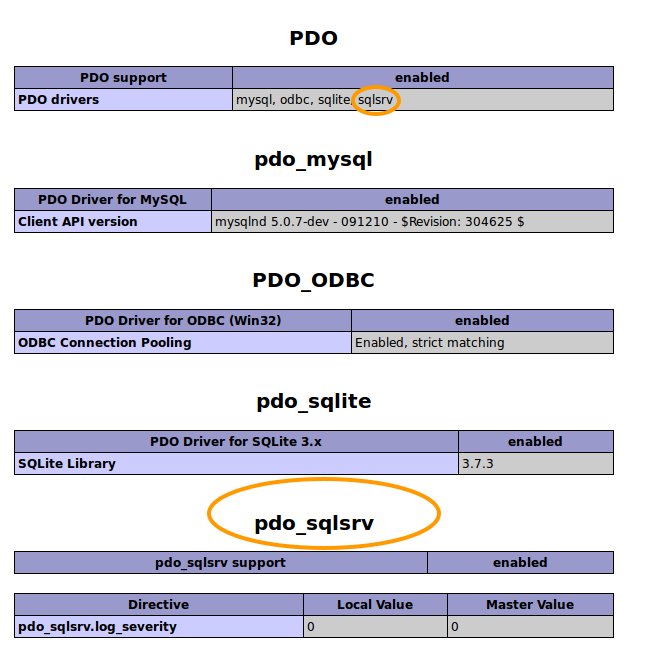
  • create a file with the following content:

<?php var_dump(PDO::getAvailableDrivers());

I hope you use XDebug to have nice var_dump. If you have ‘sqlsrv’ in the array, then we can continue.

For example:

array(4) { [0]=> string(5) "mysql" [1]=> string(4) "odbc" [2]=> string(6) "sqlite" [3]=> string(6) "sqlsrv" }

Finally, the connection with SQL Server

1
new PDO('sqlsrv:Server='.BDD_DSN.';Database='.BDD_NAME, BDD_USER, BDD_PASS, $options);

Step 2: Writing the request

I could keep the same request for both MySQL and SQL Server. I did it this way:

1
2
3
4
5
6
7
8
9
10
11
12
$requestImg = $pdo->prepare('SELECT Picture FROM Table WHERE PrimaryKey = :id');
      $requestImg->bindParam(':id', $idImage, PDO::PARAM_INT);
      try {
          $requestImg->execute();
          $requestImg->bindColumn(1, $myImage, PDO::PARAM_LOB);
          $reponse = $requestImg->fetch(PDO::FETCH_BOUND);
          if ($reponse !== false && $myImage != null) {
              $imageExistsInDB = true;
          }
      } catch (PDOException $e) {

      }

If you want to get the size of the data (image, sound) you are collecting, there is the LENGTH function in Mysql and DATALENGTH for SQL Server ( SELECT Picture, LENGTH(Picture) FROM ...)

The size can be useful for large files you want your users to download. It’s nice to specify the size of the file in the headers so that a progress bar can be displayed in the browser. Be careful: blob usually are heavy. Write your request with a Where clause on the primary key of the table, so that you’re getting only one result.

Step 3: send the data

  1. Send the headers with the php function headers. Some fun here: what kind of images do you have in your database? My images started with 0xFF, it rang a bell, I knew it was jpeg images. Try a google search.

    • Mysql : echo $myImage;
    • SQL Server
      • Prior to PHP 5.4 echo pack("H*" , $image);
      • PHP 5.4 and higher echo hex2bin($image);

Bonus

The full code, in a gist

Later in the week

the header to play mp3

header('Content-Type: audio/mpeg');

print a default image in the case the image isn’t found in the database.

1
2
3
4
5
6
7
if ($imageExistsInDB) {
  //headers here
    echo $myImage; // or the pack or the hex2bin
} else {
  //headers here
    echo file_get_contents('path/to/image/default.png');
}

Take care of headers (jpeg in your database, png for your default image…).

Useful documentation:

Note: It took me quite a while to figure out how to solve this problem, along with the issues on accents. Be nice enough to add in your code a link to this article :)

Convert a SQL Server Database to a MySQL One

Introduction

Hi. I recently had to develop a small website as part of my studies. That site had to deal with a database, a Microsoft SQL Server’s one. Problem: I wanted to work on this project while I was on holidays, but I knew I wouldn’t have an Internet access during this pediod. So, SSH wasn’t an option. The database contains text, but also pictures and music extracts. The project had to run on my school’s server, the MySQL database was only used to work more efficiently (i.e I did not try to optimize it). The database has 20 tables and about 50 000 rows.

I decided to copy the database on MySQL to work on my computer with all the advantages of it (faster, all warnings activated in PHP)

Step 1: extract the database using SQL Server Management Studio

The database I was copying had 20 tables. I tried to extract all of them, but it failed. So I extracted them one by one. The extraction of tables with images went all right (around 60 Mo / file for about 600 images in each) but the table with music in it always failed. I didn’t know if I could copy all the columns except one of them with the software, so I decided to use a more brutal approach: I wrote a PHP page that generated MySQL Insert Statements, without the music.

There is plenty of documentation to generate those files. I’ve just realized that I could have used CSV to export data :(.

Now, you should have lots of files, each on them starts with the structure of the table, then contains Insert statements, and then information about foreign keys and indexes.

Step 2: create tables with PHPMyAdmin

20 tables, even with integrity constraints, is small enough to create them by hand. I didn’t find any script to translate a syntax to another.

1- Create a new user in PHPMyAdmin. Name it as your database and ask PHPMyAdmin to create a database on which the user has full rights. This way, you won’t write your root password in your code, and if you have a security issue, the only database which can be impacted is the one you’re creating right now. I have to use Local as Host; otherwise I can’t use the console.

phmMyAdmin add User

2- Create tables I wanted to work as quickly as possible, so I didn’t optimize the database. A few things you have to take care of:

  • If you create a primary key as Unsigned Int, then all the foreign keys referencing this key must both be unsigned and have the same size (unsigned int 11 for example).
  • If you use the InnoDB Engine and are willing to add a foreign key constraint, first you have to add an index on the foreign key.
  • I chose to use varchar to replace nchar. There may be there is a better solution.
  • You can fill a blob with small files. Use longblob if you don’t care about optimization. Have a look at the documentation.

Step 3: convert SQL Server’s syntax to MySQL

Again, I did it by hand. I worked on Linux, and I used Geany to apply Search & Replace. I think you can do the same using Notepad++ (or SublimeText, I’m just trying this tool which seems to be wonderful) on Windows; I don’t know if it can handle large files (60Mo).

SQL Server export scripts are encoded in UTF-16-LE (Little Endian). The first thing you can do is changing the encoding to UTF-8. This will reduce by half the size of the files (and, I guess, speed up the process of search and replace)

What you have to delete in every file:

  • The beginning and the end of it. You only have to keep Insert statements.
  • All GO instructions. Use standard replace with GO\r\n. On Geany, I had to check the box “use escape characters”.
  • all [dbo]. that prefixes tables name. I did a “search and replace” on [dbo].. Be careful, do NOT check the regular expression box.
  • All the brackets around columns name. Because I hadn’t brackets in the data I was manipulating, I removed all of them.
  • Add a semi-colon at the end of every line. I replaced )\r\n by );\r\n

Geany has a nice option which applies “search and replace” on all the files opened.

Step 4: add data in the database.

You can use PHPMyAdmin to do so, but it cannot handle large files (~15 Mo) therefore we will use the console. With images in the database I had 2 files bigger than 30 Mo. You have to change MySQL’s configuration to allow the importation of files bigger than 16 Mo.

Open my.cnf file (http://dev.mysql.com/doc/refman/5.0/en/option-files.html). Find this line, or add it: max_allowed_packet=64M Or course, if you have a larger file, allow a larger value. Restart your MySQL server.

Open a MySQL console in the folder of your scripts, in order to avoid filepath issues. run the command: mysql --show-warnings -u NEWUSER -p. MySQL will ask your NEWUSER password, the one you created in step 2. Then, run use MYNEWDATABASE;, where MYNEWDATABASE is the one you created in step 2.

If you have integrity constraints, you can either disable them, run all your INSERTs, and enable them, or let them enabled, in which case you have to add your tables in the right order. The former solution is fast, the latter is slower but it allows you to see warnings when mysql displays them. To disable integrity constraints, run SET FOREIGN_KEY_CHECKS=0; in the console. Set it to 1 to enable them after the job is done.

Now, run the command source MYTABLE.sql; for each table you have. If MySQL displays warnings, try to read them (try, because it is hard to stop the execution of the script as the rows are multiplicating on the screen).

Job’s done :)

You can use PHPMyAdmin to export the database and give it to all your friends \o/. They will just have to go through step 2-1 and step 4.